DESTINY 2 HIVE WORM CROCHET PATTERN (UNFINISHED)

I made this for me and my boyfriend's anniversary (who loves Destiny).
If you tried out this pattern tag me on my instagram @Anteaterlovescrochet, or leave a comment below!
For any questions DM me on insta or through here.
Visit my Ravelry for more patterns
You can download a high quality free pdf pattern here: Link to PDF (EDIT Nov 2024, I have updated the pattern on the blog due to some errors, The PDF is not entirely accurate!!)
Materials
I used milk cotton yarn 5ply
X1 Light Green 50g
X2 Coffee 50g
X1 Glow in the dark yarn in light green 50g
I bought this from aliexpress
https://a.aliexpress.com/_mspxSVEPipe cleaners
Scissors
Tapestry needle


For the rose, I used this pattern: https://theloopholefox.com/assorted-crochet-rose-bouquet/ All credit for the flower goes to them. Materials: Red & dark green wool + green pipe cleaner.
Hook size: 3.5mm.
Body – (in coffee) UNFINISHED
Sl St and ch 1 at the end of every round for the body.
Row 1 – 6sc in MR (6)
Row 2 – Inc in each st around (12)
Row 3 – sc, 2inc, 2sc, 2inc, 2sc, 2inc, sc (18)
Row 4 – 2sc, 2inc, 4sc, 2inc, 4sc, 2inc, 2sc (24)
Row 5 – 3sc, inc, 7sc, 2 inc, 7sc, inc, 3sc (28)
Row 6 – 3sc, 2 inc, 8sc, 2 inc, 8sc, 2inc, 2sc, inc (35)
Row 7 – 4sc, inc, sc, inc, 9sc, 2 inc, 9sc, inc, sc, inc, 4sc, inc (42)
Row 8 – Sc 42 around (42)
Row 9 – Sc 42 around (42)
Row 10 – Back loops only, 7sc in brown, 29 sc in green, 6sc in brown. (42)
Row 11-15 – In both loops. 6sc in brown 31 sc in green, 5sc in brown. (42)

Row 16 – In both loops. Repeat row 10 (42)
Row 17-23 – Repeat rows 10 (in both loops) to 16 (43)
Row 24-30 – Repeat rows 10 (in both loops) to 16 (43)
Unfinished from here.
You can continue with your own crochet knowledge with decreasing till the end. I just started decreasing a bit every 2-1 rounds during the last 2 green bumps (rnds 31-44) before switching to brown again and crocheting the tail. For the tail I continued decreasing till the end. Make sure it is big enough to crochet the tail spikes on. Mine was about 8-9 rows
.

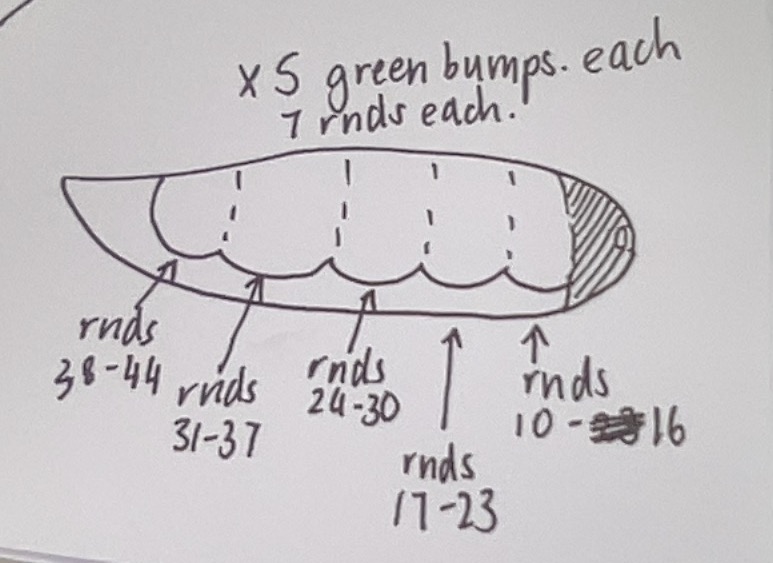
Row 31-44 – Start decreasing but continue with the bump pattern.
Row 45-52/53 – Switch yarn to coffee colour. Start decreasing exponentially to create the tail point.
Embroidered lines
Using brown wool and a tapestry needle, embroider using whipped back stitch and back stitch the lines on the body between the bumps.
Here is a good tutorial for the whipped back stitch: https://youtu.be/3F1twpIkm6g
Backstitch tutorial: https://youtu.be/rZ_wVC84UmM

Legs – Make 14 (7 for each side) in brown
Work in the round from now on.
Row 1 – 6sc in MR (6)

Row 2 – 6sc around (6)
Row 3 – 1sc, inc, 2sc, inc, 1sc (8)
Row 4 – 1sc, inc, 2sc, inc. Do not finish the row. Sl st & FO with long tail for sewing. (10)
Tail Spikes – Make 2 (in coffee)
Row 1 – 4sc in MR (4)

Row 3 – Inc, 5sc (7)
Row 4 – Sc around (7)
Row 6 – 9sc around (9) Continue row: Sc 1, inc. Place stitch marker here, start round from here. (10)
Row 7 – Inc, 9sc (11)

Row 9 – 1sc, inc, 9sc (12)
Row 10 – Sc around (12)
Row 11 – 1sc, inc, inc, 9sc around. (14)
Sl st & FO. Cut tail short as we will have a long tail for the next step.
Tail Spikes cont.
Attach yarn 3-4 st from cast off of each tail piece.
Row 12 – Sl st, sl st, 5sc, sl st, sl st. FO
Row 13 – Reattach yarn to 2nd sl st from rnd 1. Sl st, 4sc, sl st & FO with long tail for sewing.

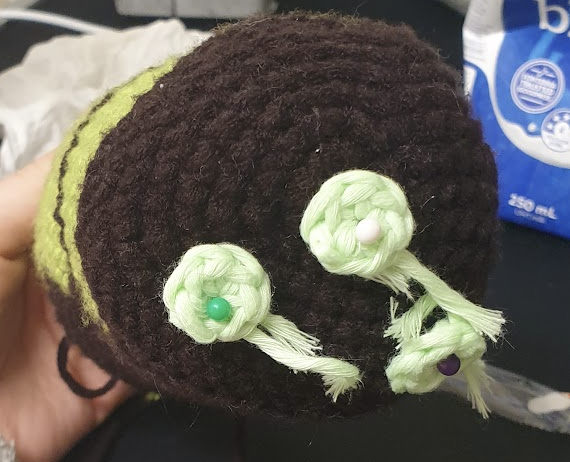
I also inserted a small piece of pipecleaner and attached it to the inside of the spike with a tapestry needle. This will allow it to be bent into shape as seen in the image.
Eyes – Make 2 (in glow in the dark pale green)
Row 1 – 6sc in MR (6)
Sl st & FO. Leave tail short and sew on with needle and thread.

Small Spikes – Make 3 (in coffee)
Row 1 – 4sc in MR (4)
Row 2 – (1sc, inc) x2 (6)
Row 4 – Inc, 6sc (8)
Row 5 – Sc, inc, 6sc (9)
Row 6 – Sc, inc, inc, 3sc, inc, 2sc.
Sl st & FO with long tail for sewing. (12)
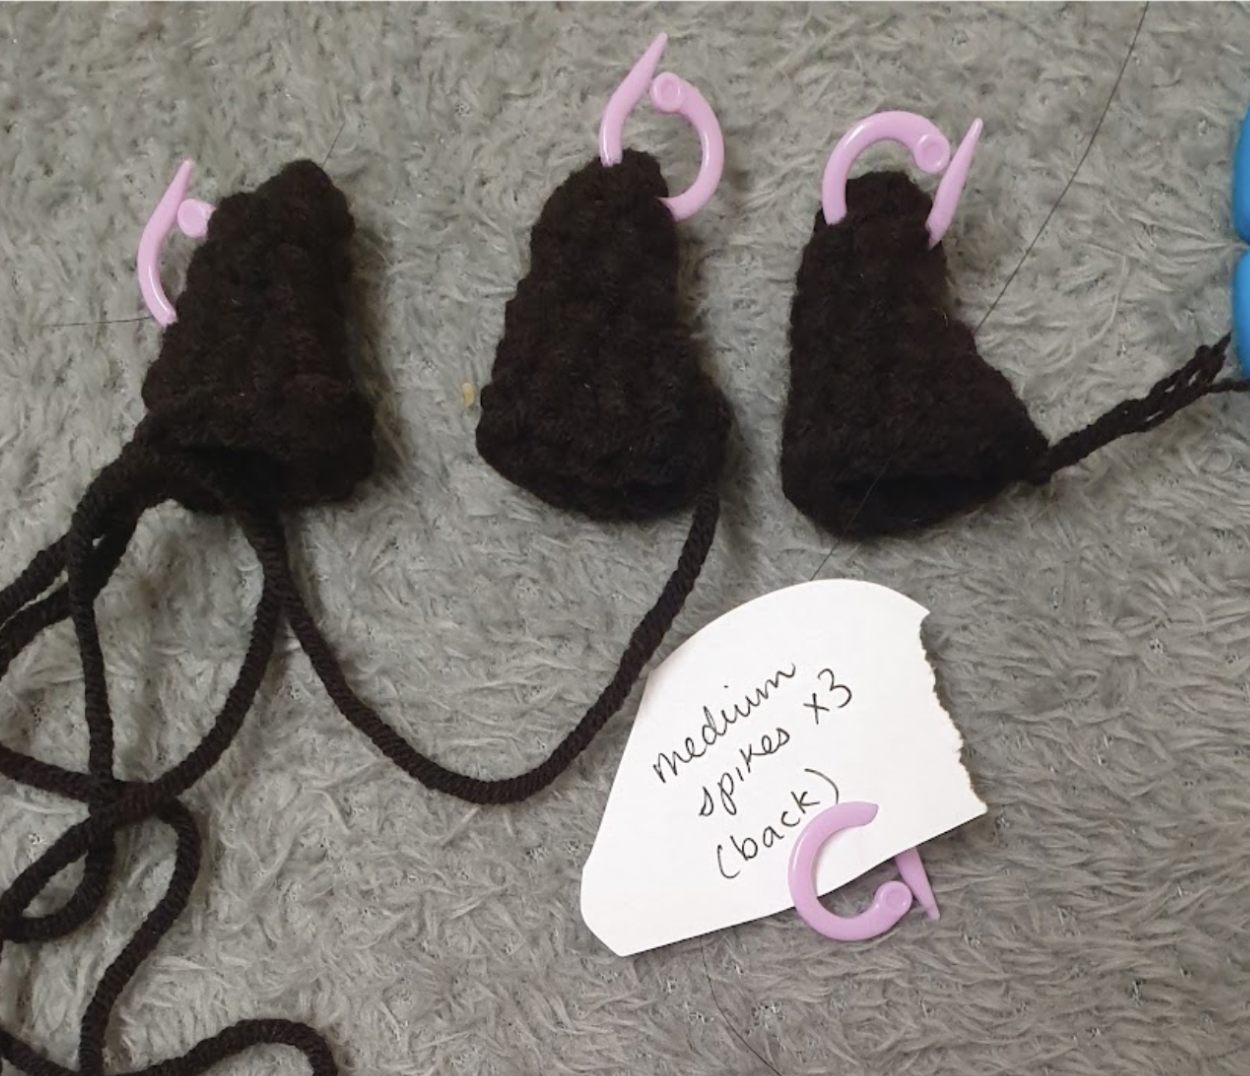
Medium Spikes – Make 3 (in coffee)
Row 1 – 4sc in MR (4)
Row 2 – (1sc, inc) x2 (6)
Row 3 – Inc, 5sc (7)
Row 5 – Inc, 6 sc (8)
Row 6 – 1sc, inc, inc, 5sc (10)
Row 7 – 4sc, inc, 4sc, inc. Do not finish row, 1sc extra.
Sl st, FO with long tail for sewing. (12)
Medium Spikes cont.
Attach yarn on the 4sc AFTER the FO, not including slst.
(should be first st of an inc of the previous round)
Row 8 – 2 Sl st, 3sc, 2 slst. FO. leave long tail for sewing.
This creates an angle of the spike to attach onto the end of the worm

Row 1 – 4sc in MR (4)
Row 2 – (1sc, inc) x2 (6)
Row 3 – Inc, sc 5 (7)
Row 4 – Inc, sc 6 (8)
Row 5 – 2sc, inc, 5sc (9)
Row 6 – 2sc, inc, inc, 5sc (11)
Row 7 – 4sc, inc, 6sc (12)
Row 8 – 5sc, inc, 5sc, inc. Do not finish row, crochet 2sc extra. Sl st, FO, Cut tail short as we will have a long tail for the next step. (14)
Large Spikes cont.
Attach yarn on the 6 sc before the FO, not including sl st.
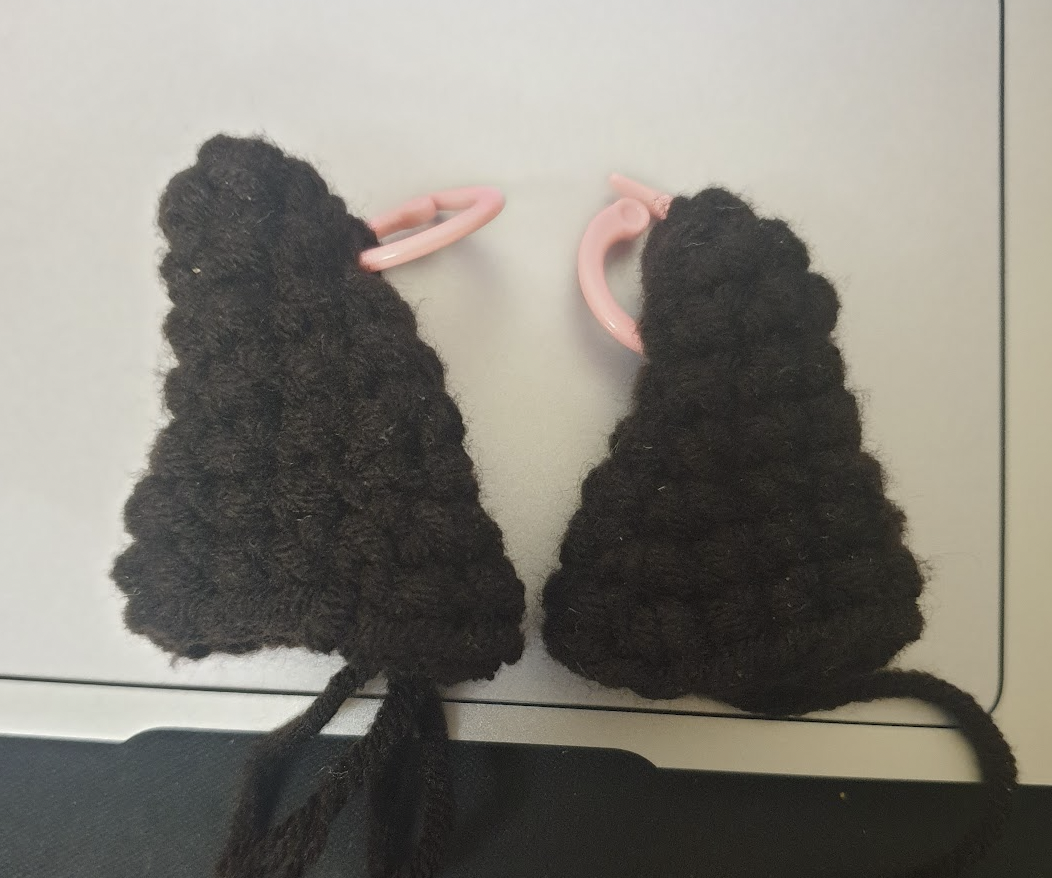
Row 9 – 2 Slst, 5sc, 2 sl st. FO. leave long tail for sewing.
This creates an angle for the spike to attach to the end of the worm seen in the 1st image. Left is with the extra stitches, right is without it. The shape is more clearly defined
Rose (optional)
https://theloopholefox.com/assorted-crochet-rose-bouquet/

I then pinned it to the mouth with a normal pin
Assembly
Legs
Pin 7 on each side of the brown belly of the worm.
The legs are positioned like this on the belly.
Position legs so they angle outwards.
For the first leg, position it to it points forward towards the face.


Tail Spikes
Position them on the end of the worm and sew them on either side. Bend them into shape.

Back Spikes

the body.
(pink for large, purple for medium and blue for small spikes.)
You can use the embroidered lines to position the spikes.
Repeat for the other spikes on either side.

Tie off and secure yarn. Weave in loose ends.
Done <3
If you enjoyed my pattern or tried it out, tag me on my Instagram @Anteaterlovescrochet, or leave a comment below. I would love to see your takes on this! :)
You can download a high quality free pdf pattern here: Link to PDF
Visit my Ravelry for more patterns
This crochet pattern is an original pattern by Lee-Anne Morris (August 2022). Please do not claim this pattern as your own. Do not reprint/repost it on your site. Personal use is okay but do not sell or distribute the pattern/items made from it.

Comments
Post a Comment